For those keeping track at home, an ROI involves selecting a section of the brain (or subset of voxels) that you have some interest in. The ROI can be a geometric shape or drawn by hand. It can be defined by anatomical markers or by functional activation or really by anything you want.
AFNI has a number of ways of creating Regions of Interest (ROIs), I review some of the more common ways of creating an ROI below. I will cover creating ROIs on the surface for use with SUMA in a later post!
Draw an ROI by hand
- Open AFNI Viewer
- Set Underlay as Subject’s Anatomical (anat_final if you use afni_proc.py)
- Right Click on Anatomical image in any view (axial, sagittal, coronal)
- Select Draw ROI Plugin (the window below will appear)
- Set your dataset for copying as the anatomical
- Select a mode for drawing
- Filled Curve lets you click draw freehand style
- Sphere and Circle options with size options
- Specify a value – if you have more than one ROI, give them different values!
- Third Mouse Click on the image where you want the ROI to be (or draw freehand while holding middle click)
- When complete, press Save.
- Down sample the mask to the size of your stats or functional datasets via 3dresample or 3dfractionize!
- Extract values with 3dmaskave, 3dmaskdump, 3dROIstats, etc…

Create ROI mathematically using coordinate systems
You can create an ROI using 3dcalc. Example #7 in the help of 3dcalc shows that the following code can be used to create a sphere ROI with a radius of 3 with origin (center) at x=20, y=30, z=70.
3dcalc -a anat+tlrc \
-expr 'step(9-(x-20)*(x-20)-(y-30)*(y-30)-(z-70)*(z-70))' \
-prefix ball
You will need to down sample the ROI for your functional or stats dataset using 3dfractionize or 3dresample. Then you can extract values with 3dmaskave, 3dmaskdump, 3dROIstats, etc… You can also draw other shapes fairly easily using 3dcalc.
If you just wish to create a sphere, you can use the -srad option in 3dUndump. 3dUndump also allows you to specify the values of specific voxels from either the terminal or a 1D file or with a combination of 3dmaskdump and 3dUndump (I like to do things with AWK or Python in the middle of the dump and Undump).
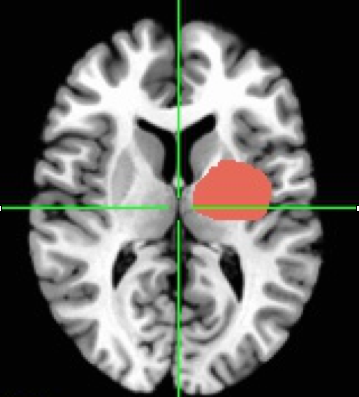
Create ROI from functional activations
- Load underlay as your subjects anatomical (anat_final if you use afni_proc.py)
- Load overlay as your subjects stats file (REML if you like)
- Set OLay and Thr sub-briks to your coefficient and t-stat (or t-stat for both if you’re inclined!)
- Set p-value to a value you feel is appropriate
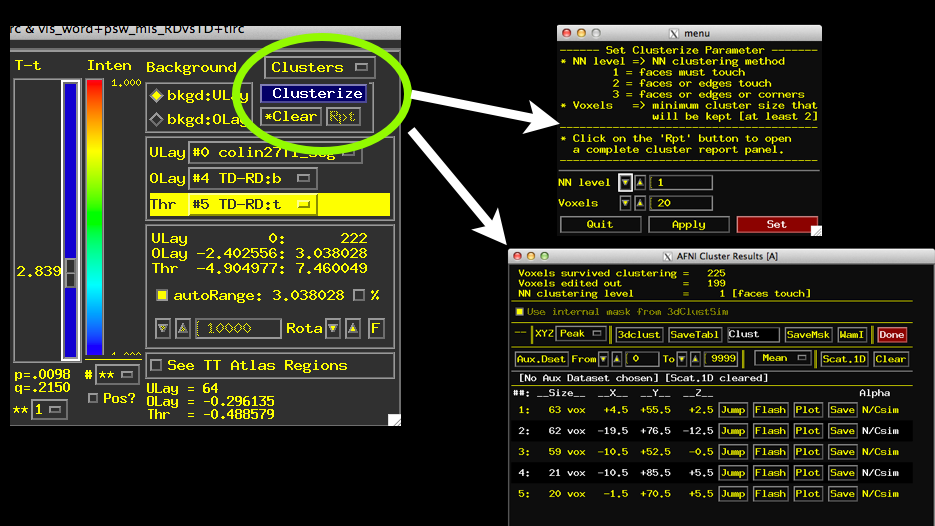
- Turn on Clustering using the Clusterize button
- Specify a Cluster size (can use a value you like or one from 3dClustSim)
- Click Set and then Click “Rpt” for “Report”
- See a window listing the clusters that meet threshold and your criteria for size.
- Play around with Jump, Flash, Plot (need AUX dataset set), and Save
- Notice that list of clusters changes as you change the p-value using your t-stat slider!
- To Save Clusters press “SaveMsk”, see a 3dClust command presented in the terminal.
- Notice automatically created Clust_mask+tlrc.HEAD/BRIK
- Each cluster saved with a separate value 1 to X, where X is the max number.
- Extract values for 2nd largest cluster via: 3dmaskave -mask Clust_mask+tlrc.HEAD'<2>’ mydataset+tlrc.HEAD
- Extract all/other values with 3dmaskave, 3dmaskdump, 3dROIstats, etc…
Create ROI based on Atlas defined anatomical region
- Identify which Atlas you wish to use, full list seen in: whereami -show_atlases
- Identify which regions are available in the Atlas you have chosen: whereami -show_atlas_code -atlas CA_N27_ML
- Create a mask for region of choice: whereami -mask_atlas_region CA_N27_ML:left:middle_frontal_gyrus -prefix left_mfg
- Repeat with other regions if necessary
- OPTIONAL: combine into single mask: 3dcalc -a left_mfg+tlrc -b right_mfg+tlrc -prefix mfg_lr -expr ‘1*a + 2*b’
- Down sample the ROI to your functional or stats datasets with 3dresample or 3dfractionize
- Extract values with 3dmaskave, 3dmaskdump, 3dROIstats, etc…
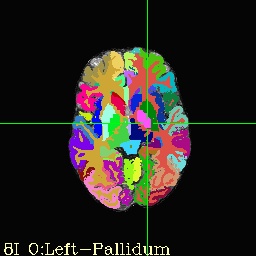
Create ROI based on individual subject Freesurfer Segmentation
- Run freesurfer segmentation for your participant
- Navigate to that folder in Terminal/Shell and run @SUMA_Make_Spec_FS
- cd into the SUMA directory
- If you launch AFNI, set underlay as brain.nii and overlay as aparc+aseg_rank or aseg_rank for same visualization as below!
- Identify region of interest in one of the following NIML label tables
- aparc+aseg_rank.niml.lt
- aparc.a2009s+aseg_rank.niml.lt
- aseg_rank.niml.lt
- Create ROI: 3dcalc -a aseg_rank.nii'<15>’ -prefix L_AMG.nii.gz -expr ‘step(a)’
- Creates subject specific ROI in Left Amygdala
- Make sure this is aligned the same as your anat_final dataset
- Down sample to your functional or stats dataset using 3dresample or 3dfractionize
- Extract values with 3dmaskave, 3dmaskdump, 3dROIstats, etc…
Summary
Are you tired yet? As you can see there are a significant number of ways to make ROIs in AFNI. I will cover the options for getting data out of ROIs in a later post.