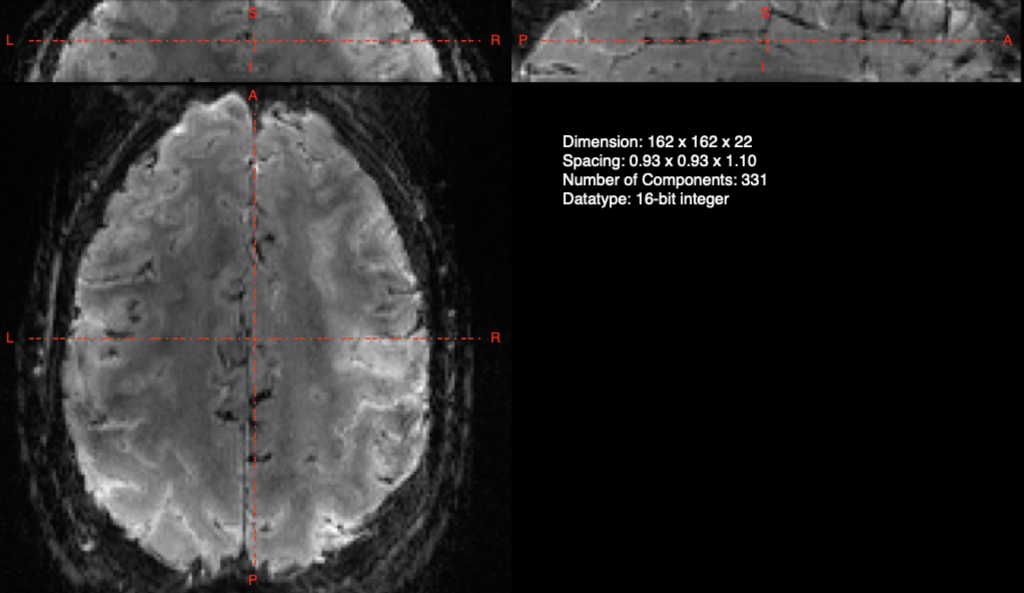
One of the benefits of high-resolution fMRI (e.g. 7T+) is the ability to see smaller structures and even discern layers of the human cortex (examples: motor cortex and DLPFC). One of the frustrating things about doing sub-1mm resolution is that you’re often constrained to partial volume coverage. Which means that you generally have something that looks like this:
And if you have’t already tried, that means that registration of these partial volumes is often more difficult than when your functional images (EPI, etc) cover the entire brain. This is true of all software packages (FSL, AFNI, and yes even ANTs).
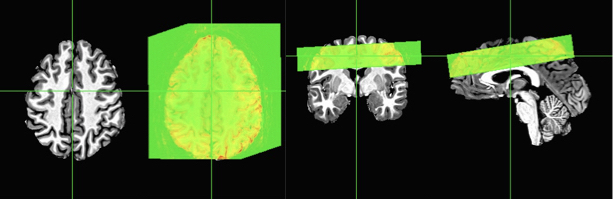
Right out of the box your two images might look something like this:
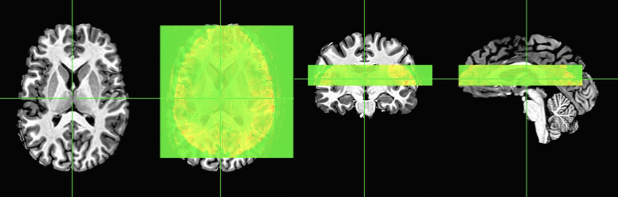
Now we can clearly see that the default AFNI view with no transformations shows the slab in the wrong position. On the left I have just the axial slice, followed by the axial slice with the overlay showing significant mis-alignment – caused primarily from the slab being too low in the brain. If you were to attempt to register this slab to the whole-brain anatomical using a standard process like align_epi_anat.py, you’d get something like this:
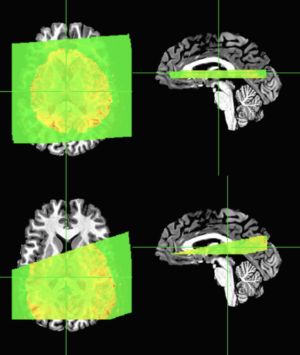
Default alignment that works fine on whole-brain images
The top row of images were made using a pretty standard call that works fine on whole-brain EPI images:
align_epi_anat.py \
-anat anat_ss.nii.gz \
-anat_has_skull no \
-epi epi1.nii.gz \
-epi_base 0 \
-epi2anat \
-big_move \
-suffix _altest \
-epi_strip 3dAutomask
And the second row of images was made with a slight modification of adding “-partial_axial” flag, which sometimes works if you have sufficient coverage AND the images aren’t terribly far off. Note that this sometimes works if the slab has the correct header/scanner information on image orientation and location relative to the anatomical images.
It turns out that one thing can be really helpful in getting automated registrations working with partial volumes is to get the the base and source as close as possible. Yes, that’s an obvious statement!
In AFNI, the way we do that is by first moving the images into the correct location. Since the slab data here is cutoff on the top and bottom, I’m also going to add some zero padding around the images to help with the process.
3dZeropad -S 10 -I 20 -prefix epi1_rs.nii.gz epi1.nii.gz
3drefit -dzorigin 20 epi1_rs.nii.gz
Here I add 20 empty “zero” slices above the image and 20 slices below the EPI. In the second statement, I simply move the origin of the image 20 mm up, which is like a lightyear in brain space! Now my images look closer, but still not aligned.
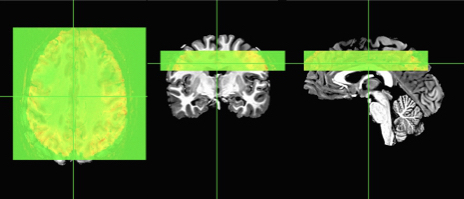
At this point, we can attempt some alignment using any of your favorite alignment programs. Since I like AFNI, I’ll use the veritable 3dAllineate with some options that are fairly similar to what I would use on other imaging data. You could also use align_epi_anat.py, or even options within afni_proc.py.
3dAllineate \
 -base anat_ss.nii.gz \
 -input epi1_rs.nii.gz \
 -prefix epi1_rs_al.nii.gz \
 -1Dmatrix_save epi1_rs_al_12.1D \
 -cost lpc \
 -final wsinc5 \
 -source_automask -autoweight \
 -twopass \
 -verb
Now you can see that the slab is correctly aligned with the skull-stripped anatomical. The two axial slices are just to show you with the overlay on and off. You can also see that this is a far cry from the original locations and those registrations shown earlier in this post.
Happy Registering! This post made possible by the amount of time it takes to register 300 brains to a new template and do deformation metrics on them! Yes, paper coming soon.