In the past, I’ve posted on creating ROIs in AFNI and ways to manipulate those ROIs once created. But something that comes up fairly often on the AFNI message boards is how to use 3dcalc to create different ROI shapes. The most common that I’ve found are creating spheres and cubes, I’ve made some crazy shapes lately, but for today I’m just going to cover the basics.
Creating a sphere with 3dcalc
Sphere’s have two major properties, a origin (center) and radius. For our example, our origin will be in the left hippocampus (x=23, y=21, z=-6.5). To create a sphere with a radius of 3mm, use the following:
3dcalc -a `@GetAfniBin`/TT_N27+tlrc.HEAD \
-prefix SphereROI \
-expr 'step(9-(x-23)*(x-23)-(y-21)*(y-21)-(z+6.5)*(z+6.5))'
Here I use the script @GetAfniBin to reference the Colin27 Template for reference so that my ROI will be in the same space, you could also use a brain in your dataset or any other template/atlas. The first number ends up being your radius squared (3^2 = 9), followed by your coordinates. 3dcalc will treat x,y, and z in a coordinate space (and t if you want time!). To represent positive numbers, represent them as a subtraction and to represent negative numbers in your origin, use addition. Notice each set gets multiplied by itself.
Creating a box with 3dcalc
To define a box we simply need to define the x, y, and z coordinates that are included in our ROI. The following code will create an ROI over part of the visual cortex.
3dcalc -LPI -a`@GetAfniBin`/TT_N27+tlrc.HEAD \
-prefix BoxROI \
-expr 'a*within(x,-12,16)*within(y,-90,-76)*within(z,4,12)'
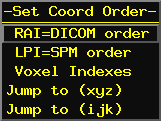
Here we tell 3dcalc that we want to use LPI (e.g. SPM) code for x,y,z, the major difference is that it it flips the X and Y, so in DICOM (or RAI) order a positive X is on the left and in LPI it’s on the right. Similarly a positive Y would be posterior in RAI but is anterior in LPI. You can easily use either coordinate system by using the readout in the AFNI viewer. You can right click where it shows the x,y,z in the upper left corner and select LPI instead of RAI.
Creating ROIs from a text file with 3dUndump
If you have a series of coordinates (or just one) and you want to make a sphere quickly, you can use 3dUndump. In 3dUndump, you specify a text file with each line representing between 3 and 5 numbers. The first 3 (mandatory) are either xyz (coordinates) or ijk values that will represent your mask. You set either xyz or ijk as an option to the program. If you wish to add a value to that particular mask, you can add a fourth number, which can be useful to telling your masks apart later on! If you use the “srad” option, you can add a fifth number to specify the radius of your ROI.
So if I had the text (mycoord.1D) file as follows:
23 21 -6.5 1
And I executed the command:
3dUndump -master `@GetAfniBin`/TT_N27+tlrc.HEAD -srad 4 -xyz mycoord.1D
Would create a sphere with radius 4, centered at x=23, y=21, z=-6.5 (Left Hippocampus as before), all voxels within that sphere will be set to 1. Adding more lines to the input file will create more ROIs. If you are using ROIs from a paper you might want to add -orient LPI.
Going beyond the basics
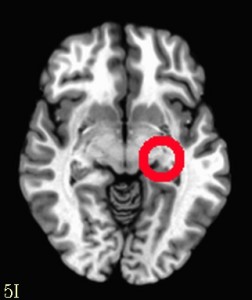
It’s true that you can create complex commands in 3dcalc to make even more interesting shapes (though the utility of those can be questionable). But it’s often easier to create multiple ROIs and then use 3dcalc or 3dmask_tool to add, subtract, erode, or dilate them. For instance if you wanted to create a circle instead of a solid sphere, you could run 3dUndump twice with two different values for srad (radius), use 3dcalc to subtract the smaller radius from the larger one and you will get the following.
An alternative approach would be to create the smaller sphere, dilate it with 3dmask_tool and then subtract the original from the dilated sphere. The sky really is the limit, and don’t forget that you can use masks of the brain (or a specific region via whereami) to carve parts of your ROI away or add to it!