Dropping file extensions

Randomly, for those people who do a lot of manipulation of file names, it can be painful to constantly use sed or awk or basename to change the filename without the extension.  Here are three options to copy a file via 3dcopy (part of AFNI, works just like cp, but for image files, will also convert them to different formats).  Assume I have the following files and want to convert them to uncompressed format NIFTI.

Subject001_run1.nii.gz Subject001_run2.nii.gz Subject001_run3.nii.gz

Here are three options:

1. basename

for aFile in *.nii.gz
do
   newName=`basename $aFile .nii.gz` #returns subject001
   3dcopy $aFile $aFile.nii #effectively: 3dcopy subject001.nii.gz subject001.nii
done

2. sed

for aFile in *.nii.gz
do
   newName=`echo aFile | sed 's/.nii.gz/.nii` #returns subject001.nii
   3dcopy $aFile $newName #effectively: 3dcopy subject001.nii.gz subject001.nii
done

3. The old % trick

for aFile in *.nii.gz
do
   3dcopy ${aFile} ${aFile%.nii.gz}.nii #effectively: 3dcopy subject001.nii.gz subject001.nii
done


Converting DICOM files to NIFTI

Most people who are processing MRI/fMRI data will need to convert data from the scanner format DICOM to a more usable NIFTI format that is used by a variety of neuroimaging software packages (e.g. AFNI, FSL, SPM).  As with most things in neuroimaging, there are a variety of options and here are a few (though not an exhaustive list):

1) dcm2nii

dcm2nii is a part of mricron (the NIFTI version of mricro).  It’s free to download, it was programmed in Delphi (object-oriented Pascal).  It’s a great multipurpose DICOM converter that can meet the needs of people using any neuroimaging software.  It comes with both a command-line and GUI interface for easy scripting – and it runs on Windows (in addition to Mac and Linux) for those who might need this functionality.

2) MRIConvert

MRIConvert is very similar to dcm2nii and may fit your workflows better.  It also runs on Mac/Linux/Windows.

3) AFNI’s to3d/Dimon

AFNI comes with (at least) two programs for easily converting DICOM files to NIFTI.  Dimon really ends up calling to3d with the correct options, but I know a lot of old school users who prefer to use to3d directly with their own options.  Dimon requires the DICOM files to be organized by sequence, you can do this with a sorting script (like the one on MRIConvert’s page).  However you can also use other AFNI tools (dicom_hdr – shows entire header of DICOM files; dicom_hinfo – shows a specific field in the DICOM header) to create your own sorting mechanism.

Code to sort to separate runs:

for each in path/to/dicoms
do
 seriesID=`dicom_hdr ${each} | grep "Series Number" | awk -F"//" '{print $3}'`;
 if [ ! -e path/to/outputs/SORTED/${seriesID} ]; then
 mkdir -p path/to/outputs/SORTED/${seriesID};
 echo "Series ${seriesID}"
 fi;
 cp ${each} path/to/outputs/SORTED/${seriesID};
done

From here you can run Dimon on each folder.  If you wanted to get the protocol, you could then do something like this (you may need to modify the number after -tag to meet your DICOM specs, you can figure out that number via dicom_hdr):

cd /path/to/outputs/SORTED/2/
SubjID=`ls | sort -n | head -1 | xargs dicom_hinfo -last -tag 0010,0020 | awk '{print $1}'`
Protocol=`ls | sort -n | head -1 | xargs dicom_hinfo -last -tag 0018,1030 | awk '{print $1}'`
Dimon -infile_prefix /path/to/outputs/SORTED/2/ -gert_create_dataset -gert_write_as_nifti -dicom_org
mv OutBrick* ${SubjID}_${Protocol}.nii

And this could of course easily be scripted to run through each folder in the SORTED folder to convert each sequence.

4) SPM

SPM has a DICOM converter via the graphical user interface.  If you’re creative, you can make both 3D and 4D volumes, though this can require using commands directly to matlab batch.

5) Freesurfer’s unpacksdcmdir

Freesurfer has a nice utility for unpacking DICOM directories, particularly unsorted directories.  I tend to use the tool mostly to see what is actually in a folder without converting it.

unpacksdcmdir -src /path/to/dicom -targ /path/to/output -scanonly mytextoutput.txt

Summary

I usually use either dcm2nii or AFNI’s Dimon/to3d.  I’ve found a few cases where dcm2nii gives me an incorrectly oriented brain (upside down) where AFNI’s tools are correct.  I often appreciate that to3d/Dimon are not black boxes, you can usually see what Dimon is doing and if you don’t think the options are correct – you can go back and change them.  I find both tools to be very easily scripted and as most people know – I try to have everything scripted.
Correlating Brain and Behavior in AFNI

If previous posts hadn’t given it away, AFNI is my tool of choice for processing neuroimaging data.  A lot of people get confused on the sheer number of options there are and that most things can be accomplished in a variety of ways.  Today I’m going to outline three ways of doing Correlations between fMRI data and some kind of external data (e.g., a reading measure).

Data: 10 subjects of MRI data and an associated data table

subject value
1     1.59583042
2    0.30977361
3    0.17275604
4    1.77287327
5    1.91858457
6    -1.26554353
7    1.73914139
8    -0.03359282
9    0.62022641
10    -2.0418750


3dTcorr1D: Perhaps the easiest way to run a correlation between brain and behavior is to run 3dTcorr1D.  First you will need to compile all of your relevant statistical coefficient files into a single NIFTI or HEAD/BRIK pair.  You can use 3dbucket to do this.  In this case, since I have 10 subjects I use 3dbucket to extract the condition I want to correlate from each subject and put it into an all_visual+tlrc dataset.  After this, then it’s just a matter of calling 3dTcorr on the dataset and supplying the covariate file listed above.  The [1] tell AFNI to get the column of values (because 0 would be the subject number) and the {1..$} tells AFNI to get all the rows after the header.  These are in order to match the input dataset created by 3dbucket.

3dbucket -prefix all_visual+tlrc Sub01+tlrc.HEAD[visual#0_Coef] Sub02+tlrc.HEAD[visual#0_Coef]...
3dTcorr1D -prefix corr_visual all_visual+tlrc. cov.txt[1]{1..$}


3dRegAna: 3dRegAna can be used to perform simple and multiple regression (or even step-wise regression) on fMRI data.  Here we do a simple regression (one DV, one IV).  Then we use 3dcalc to take the square root of the R-squared term and then get the sign for the correlation based on the b-value from the regression.

3dRegAna -rows 10 -cols 1 \
-xydata 1.59 "all/stats.Sub1.nii.gz" \
-xydata 0.30 "all/stats.Sub2.nii.gz" \
-xydata 0.17 "all/stats.Sub3.nii.gz" \
-xydata 1.77 "all/stats.Sub4.nii.gz" \
-xydata 1.91 "all/stats.Sub5.nii.gz" \
-xydata -1.26 "all/stats.Sub6.nii.gz" \
-xydata 1.74 "all/stats.Sub7.nii.gz" \
-xydata -0.03 "all/stats.Sub8.nii.gz" \
-xydata 0.62 "all/stats.Sub9.nii.gz" \
-xydata 0.91 "all/stats.Sub10.nii.gz" \
-model 1 : 0 -bucket 0 ./corr_visual
#calculates correlation coef
3dcalc -prefix corr22 \
-a story.corr_visual+tlrc.[5] \
-b story.corr_visual+tlrc.[2] \
-expr 'sqrt(a)*ispositive(b) - sqrt(a)*isnegative(b)'

3dttest++/3dMEMA: You can also use 3dttest++ or 3dMEMA to run a correlation, with the caveat that you need to standardize both your fMRI and behavioral data before running the analysis.

gen_group_command.py -command 3dttest++ \
-dsets sub?.nii.gz sub??.nii.gz \
-subs_betas 0 \
-options -covariates cov.txt

Which will generate the following command:

3dttest++ -prefix ttest++_result \
 -setA setA \
 1 "sub1.nii.gz[0]" \
 2 "sub2.nii.gz[0]" \
 3 "sub3.nii.gz[0]" \
 4 "sub4.nii.gz[0]" \
 5 "sub5.nii.gz[0]" \
 6 "sub6.nii.gz[0]" \
 7 "sub7.nii.gz[0]" \
 8 "sub8.nii.gz[0]" \
 9 "sub9.nii.gz[0]" \
 10 "sub10.nii.gz[0]" \
 -covariats cov.txt

Agreement between software packages

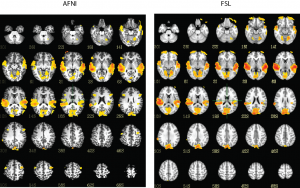
Always nice when there is agreement between different neuroimaging packages.  A quick block design analyzed in both AFNI and FSL – giving pretty similar results for the same participant.

AFNI and FSL


Both packages have distinct advantages.  For AFNI: 1) it’s faster ; 2) it has more customizable options; 3) the viewer allows you to adjust the p-value with a slider bar; 4) there is something to be said about being able to see the values for a particular voxel even after all of the processing has been done; 5) AFNI has some more advanced group analysis tools for doing mixed effects modeling (LME style) and meta-analyses (3dMEMA).

FSL really shines for having 1) a nonlinear transform; 2) a complete DTI analysis pipeline; 3) a GUI interface for new users (though AFNI’s uber_subject.py is competing there); 4) better documentation/help.

In the end though, you always have to know what you’re doing.  And if you do – you should get roughly the same results with either package.

Using the GNU Scientific Library with Xcode

The GNU Scientific Library (GSL) includes convenient use to matrices among other things.  One convenient way to install GSL is using homebrew.  Once installed a quick “brew install gsl” will do the work for you.  To then use GSL with Xcode, do the following:

  1. Create a new Xcode Project
  2. Edit Build Settings
  3. Under “Other Linker Flags” add the following:
    1. -lgsl
    2. -lgslcblas
  4. Under “Header Search Path” add the following:
    1. /usr/local/Cellar/gsl/1.15/include
  5. Under “Library Search Path” add the following:
    1. /usr/local/Cellar/gsl/1.15/lib
  6. Add the appropriate #include to your source files for the GSL library you wish to use.  For example: #include <gsl/gsl_rng.h>
  7. Code and Compile.

I recommend this blog post for more information – particularly if you wish to compile GSL by hand.