You can never be too careful in terms of data quality. AFNI offers a number of checks on the data via the automated @ss_review_basic and @ss_review_driver generated by afni_proc.py. But occasionally you need more information! And also if you’re comparing data across multiple scanners, it’s not a bad idea to have some of these numbers for doing just that! It’s also worth noting that the fBIRN utilities can also be useful for processing phantom data for comparing between scanners. But really, this post is about how to get these QC/QA checks working! Installing the fBIRN QC/QA tools on a Mac requires a little bit of hackery!
- Install AFNI. I feel like most people already know that would be step 1 if you’re reading this blog.
- Install Xcode for Mac OS X
- If running 10.7 or later, use the App Store
- If running 10.5/10.6, either install off the CD or head to Apple Developer
- Head over to the BIRN site and grab the xcede tools (alternatively go straight to nitrc).
- Install the tools into a convenient directory (e.g. /usr/local/xcede)
- Add /usr/local/xcede to your path
- Install homebrew – you won’t regret it
- Homebrew is a package management system for installing (mostly) unix/linux tools.
- Run this to install: ruby -e “$(curl -fsSL https://raw.github.com/mxcl/homebrew/go)”
- Install a few brew packages
- brew install imagemagick
- brew install ghostscript
- Remove copies of the BIRN tools that don’t work on mac
- cd /usr/local/xcede/bin
- rm convert
- rm montage
- Link the homebrew installed tools to where you removed the old tools!
- ln -s /usr/local/Cellar/imagemagick/6.7.7-6/bin/convert /usr/local/xcede/bin/convert
- ln -s /usr/local/Cellar/imagemagick/6.7.7-6/bin/montage /usr/local/xcede/bin/montage
- Change into a directory with a NIFTI file for testing
- cd /path/to/MRIdata
- Test it out!
- Convert to XML: analyze2xcede aNiftiFile.nii.gz QA_aNiftiFile.xml
- fmriqa_generate.pl QA_aNiftiFile.xml QADirectoryName
- Repeat for each run in your subject and for all subjects!
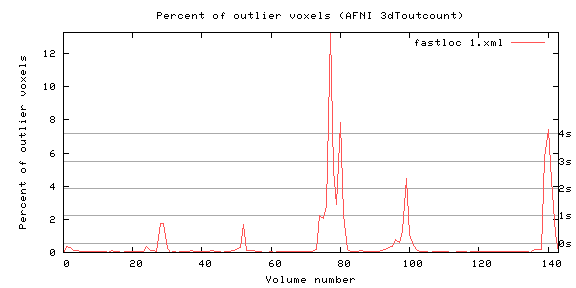
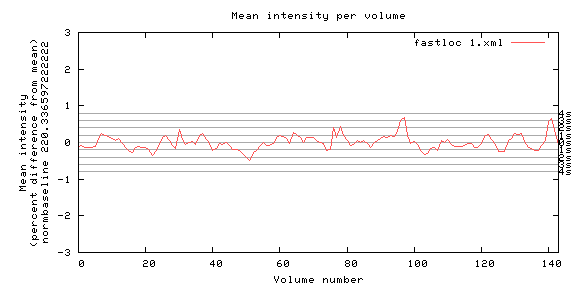
This will generate an output folder with a series of files inside. Open up the index.html file for the main report. In particular, pay attention to the SNR and SFNR values. If these are low (less than 40, you should be concerned!). It could be that you need to crop off the first few pre-steady-state images before running the script. Alternatively you can run fmriqa_generate.pl with the –timeselect 4: flag to not process the first four TRs. Read the help for more info!
There are also a series of helpful charts for seeing if things went wrong. Below are just two of the many many helpful charts generated automatically. The first shows outliers (output of 3dToutcount from AFNI) and the second shows mean intensity per volume.