First let me say that I am a huge huge fan of Freesurfer. It makes my life easier in so many ways by 1) creating surfaces that we can display fMRI results on; 2) giving beautiful cortical and subcortical segmentations for use in the upcoming (soon, really) pediatric Atlas that I’ve been working on; 3) useful for measures of brain volume and cortical thickness. If I had two small complaints about Freesurfer, it’s exactly what you would expect: It’s slow (24-hours per subject on my SUPER Mac) and the Group Analysis tools aren’t always easy to interact with.
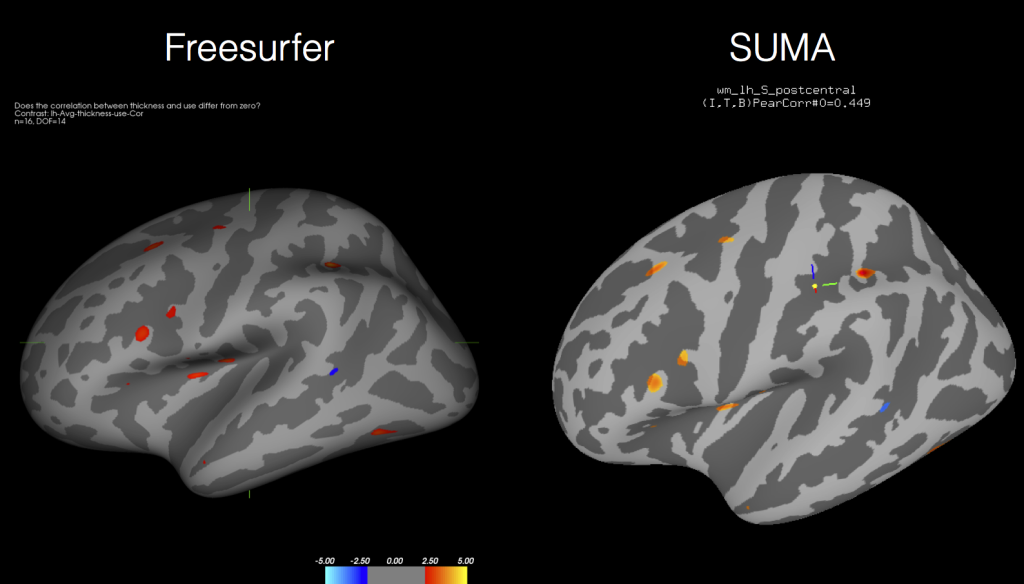
Well I’ve posted previously about how to run Freesurfer jobs in parallel so that if you have an 8-core Mac you can process 8 subjects simultaneously. Today I’m going to show you how you can use AFNI’s tools, like 3dttest++, to get the same information out of cortical thickness measures as you do using the Freesurfer tools! That’s right, by the end you will see how the two softwares give you identical results like these (forgive the tilt and colors being a bit off):
Let’s start by saying you obviously need AFNI and Freesurfer installed on your system. I also find it very useful to make a SUMA folder for your fsaverage subject. This will come in handy later for visualizing the results in SUMA:
cd $SUBJECTS_DIR/fsaverage
@SUMA_Make_Spec_FS -sid fsaverage
You’ll also need to process all of your participants through the Freesurfer pipeline, preferably with the -qcache option added onto the end:
cd /path/to/subjects/datafiles
for aSubject in Subject01 Subject02 Subject03
do
    recon-all -s $aSubject -i $aSubject/inputNifti.nii.gz -all -qcache
done
Of course you can batch these using Parallel if you want to speed things up. Once you complete all of the processing, you will find that each subject has their Surface data stored in the aptly named ‘surf’ folder. If you are doing cortical thickness measurements, you’ll want to locate the lh.thickness and rh.thickness files, which are the unsmoothed thickness measurements. If you used @SUMA_Make_Spec, these are converted to GIFTI datasets by the script, and of course there are the std.141.?h.thickness.niml.dset files representing the standard mesh, again without any blurring.
At this point you have a choice, you can use AFNI/SUMA’s SurfSmooth to smooth your thickness files, or you can instead locate the files that Freesurfer has been kind enough to both resample to the fsaverage brain with different levels of smoothness and use those instead! Those files are called lh.thickness.fwhm10.fsaverage.mgh and rh.thickness.fwhm10.fsaverage (where fwhm ranges from 0 to 25 in increments of 5). If we want to convert these to GIFTI datasets that AFNI/SUMA can use, we simply need to use a built in Freesurfer tool (the same one used by @SUMA_Make_Spec_FS) to convert the files, called mris_convert.
mris_convert -c ./Subject01/surf/lh.thickness.fwhm10.fsaverage.mgh \
$SUBJECTS_DIR/fsaverage/surf/lh.white \
Subject01.lh.thickness.fsaverage.gii
If you do this for each hemisphere and each subject, you will end up with a folder full of thickness files already smoothed to some FWHM. You can then use ANY of the AFNI tools to perform group analysis!
3dttest++ -prefix lh.Group1_vs_Group2.gii  \
-setA Group1/*.lh*.gii \
-setB Group2/*.lh*.gii
You can then view the results in SUMA:
suma -spec /usr/local/freesurfer/subjects/fsaverage/SUMA/fsaverage_lh.spec
And then load up the surface controller and Load Dset for the output of your t-test, correlation, mixed model, the sky is the limit. And as you can see from the above figure, the results coming out of AFNI’s tools are nearly identical to those processed directly in Freesurfer’s mri_glmfit (or qdec).
If you’re wondering why you might want to go through this effort to get identical output, beyond just the ease of using AFNI tools and the speed improvement, I’ll remind you that you can use any AFNI tool now with your Freesurfer data including 3dMVM and 3dLME!
