How to Analyze Diffusion Tensor Imaging Data (Review)

After my first year of blogging, I ran a “One Year Review” piece that covered all of the articles that I wrote in that first year.  And that article tends to get hit by search engines fairly often since it was published on December 3, 2013.  Sure, I meant to go back and do a “Two Year Review” piece in 2014, but I clearly failed to do that!  It wasn’t until yesterday when a kind reader emailed in to ask why either 1) everything wasn’t converted over to the wiki yet, or 2) there weren’t more review pieces that had helpful links to major articles on one topic.  The answer to both of these is that things have been a bit crazy busy here, and I’ll try to do better!  Nevertheless, since the reader specifically asked for DTI articles, I’m going to do a topic review here calling out all of the articles that cover some semblance of DTI data analysis and perhaps that will give you inspiration for reading some of them!  I’ll also try to wrap up with a “where are these posts going in the future bit,” unless I get distracted by a puppy sometime between the start of this article and midnight.

As with all things in imaging, you have a large number of possible avenues of analysis.  The first question most people ask is “what software should I use!?!”.  The answer is usually “it depends!”.  I’m not trying to dodge the question, it really does depend, to some folks it may depend on the type of analysis that you wish to do.  If you’re interested in doing “whole-brain” style analyses on DTI data, you might be interested in FSL‘s TBSS package or Freesurfer’s Diffusion Analysis tools.  If you’re interested in doing tractography, you might turn to AFNI’s FATCAT (PDF) implementation or FSL’s bedpostx/probtrackx tools or Freesurfer’s TRACULA pipeline!  And these are only a quick partial list of the tools you could choose from for each analysis type!  You could read this article for a partial overview of tools.  Or, after clicking all of the links above, you might checkout Dipy, TrackVis’ Diffusion Toolkit, or Camino!  If you’re interested in packages that take care of a lot of preprocessing and artifact detection/correction, you might look more at TORTOISE or DTIprep.  Or you might do the analyses in a tool that you’re already familiar with to lessen the learning curve or perhaps to more easily integrate your DTI data with your functional and structural data analyses!  Whatever your choice may be, there are tutorials for some of these below!

AFNI

Part 1 – Registering DWI data to anatomical & Fitting Tensors

Part 2 – Basics of Deterministic Tractography & Visualization in SUMA

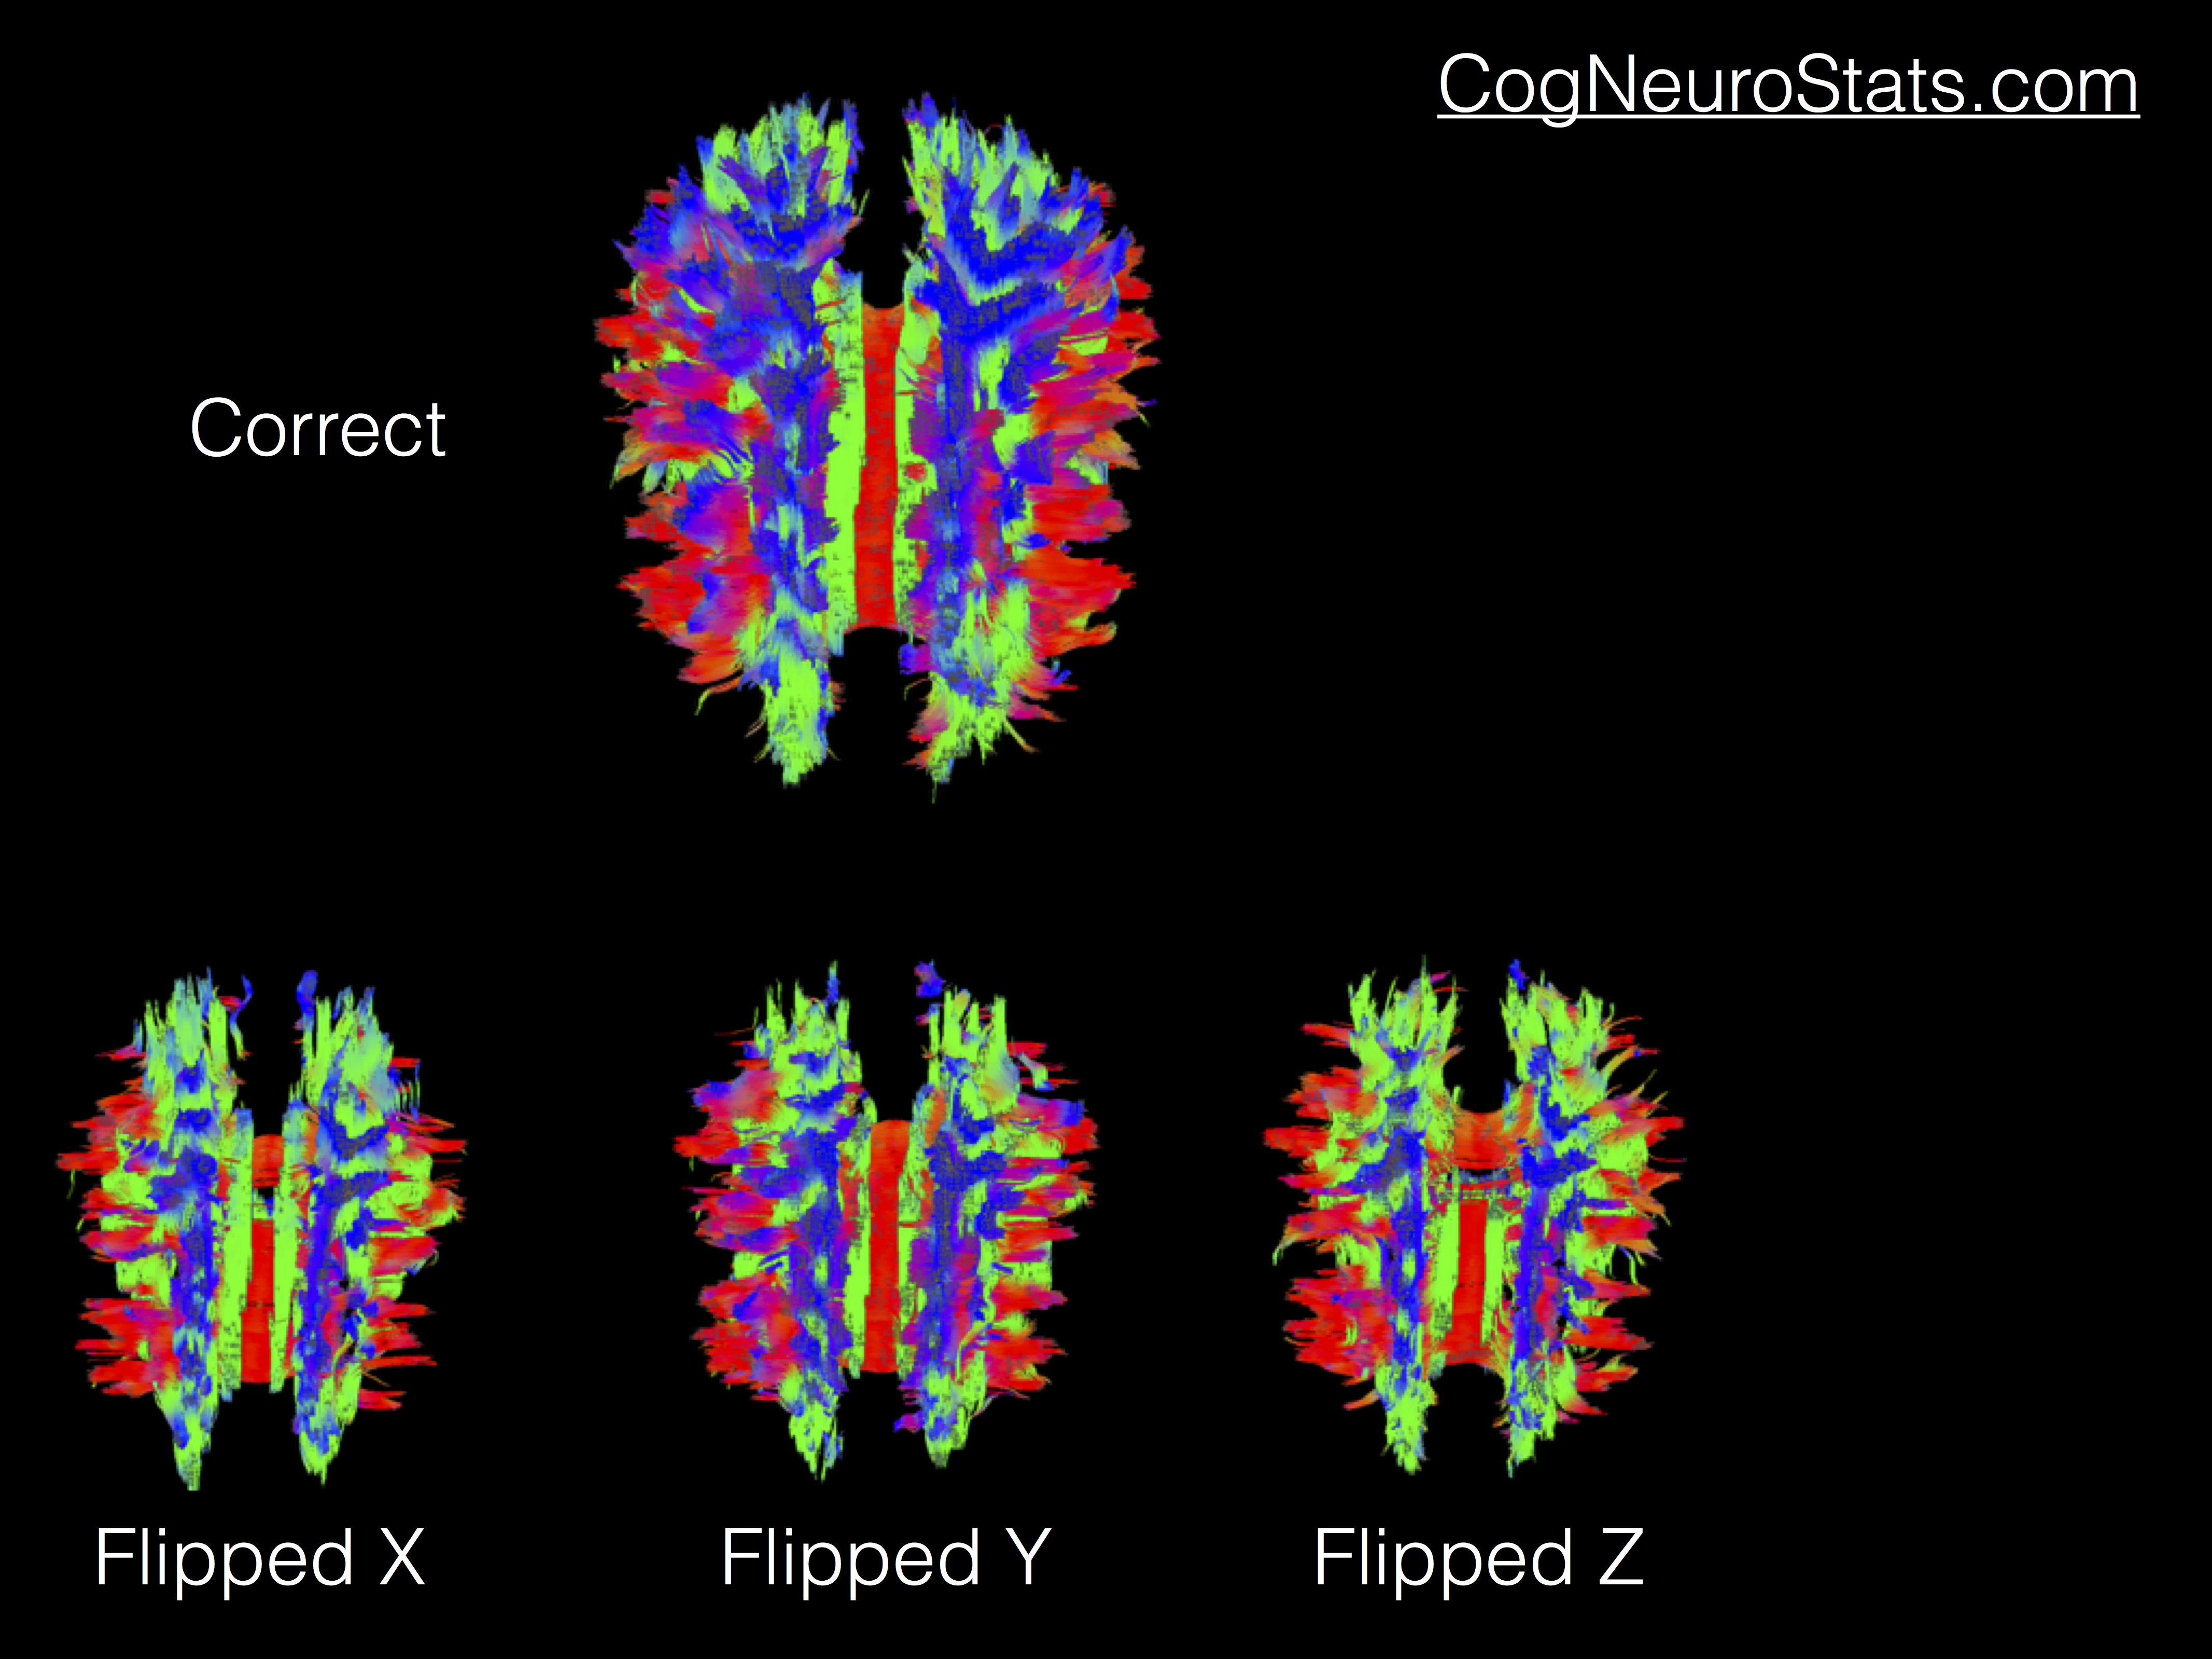
Part 3 – More visualizations and the importance of flipping B-Vectors

Rotating b-vectors – A script using AFNI tools to rotate B-Vectors due to movement parameters

FSL

Part 1 – Basics of DTI in FSL for tensor fitting and Tract-based Spatial Statistics (TBSS)

Part 2 – Visualization of DTI results in FSL’s viewer (aptly named FSLView)

TORTOISE

Part 1 – Preprocessing Diffusion data using TORTOISE’s DIFF_PREP tool

Part 2 – Fitting tensors using TORTOISE’s DIFF_CALC tool

Part 3 – Combining blip-up blip-down diffusion data in TORTOISE for optimal results
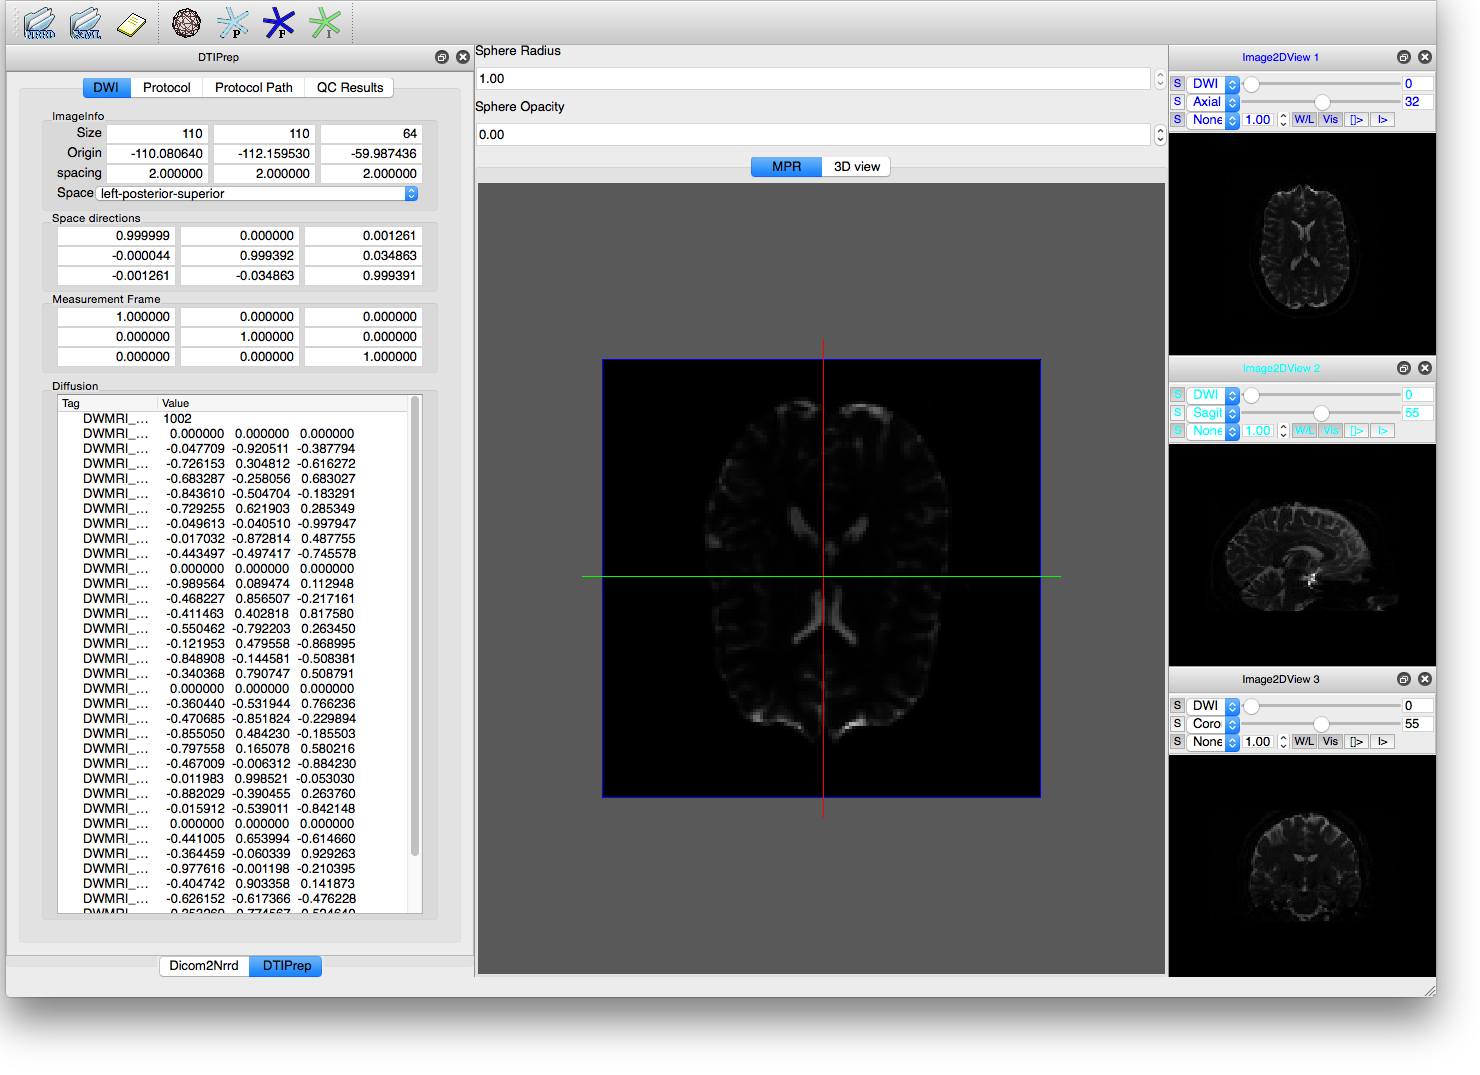
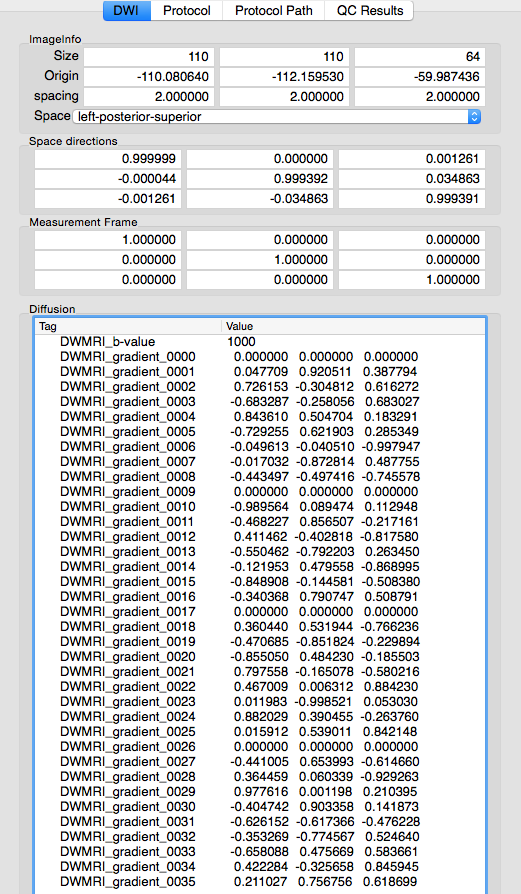
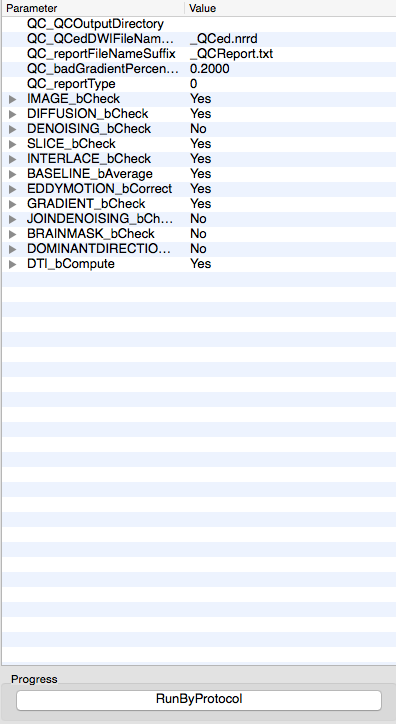
DTIprep

Part 1 – HowTo preprocess diffusion data using DTIprep

Part 2 – An example script to automate using DTIprep

Happy processing!

Getting started with Machine Learning

So we have to face it, Machine Learning is the buzzword of the year (multiple years?).  But where does one start learning?  Well assuming you’ve taking some stats classes in the past and words like regression don’t scare you off, you may be able to jump right in to some of the applicable textbooks out there.  In fact several of the “go to” books in Machine Learning (also sometimes called Statistical Learning) are available free!  I would recommend you start with “An Introduction to Statistical Learning: With Applications in R” by James, Witten, Hastie, and Tibshirani.  Once you’ve gone through that book, an excellent followup (by the same authors) is available in “The Elements of Statistical Learning: Data Mining, Inference, and Prediction”.  Before you get upset, yes, the second book was published first.

Now if you’re thinking to yourself “reading takes a lot of time, where can I take a class to learn all of this?!”, then you’re also in luck.  There is an in-depth introduction with over 15 hours of videos available here, which follows the Intro book.  And since we live in the age where everyone wants to enroll in multiple courses simultaneously to get more perspectives, you can also see slides and videos for another course using this link.

Finally, if you’re hoping to get even more theoretical background (read: math), then I highly recommend the Andrew Ng course from Stanford as well, available free online both here and through iTunesU (among others).

Example use of DTIprep for DWI Quality Checking

In a previous post, we covered using DTIprep for preprocessing of diffusion weighted imaging (DWI) data.  I’ve written a quick script (below) to automate DTIprep for the purposes of running the default QC check.  My workflow has DICOM data automatically downloaded from our PACS server, then automatically converted to NIFTI format, and then organized in the file structure.  This program is just adding the QC checks for the diffusion data, whereas other scripts will preprocess the fMRI data using afni_proc.py.

The script itself can live anywhere and will create a temporary directory for any files used wherever the script is called from.  So if you were to call the script from your home directory like so:

dti_qc.sh /data/mri/subject001/dti/ep2ddiff.nii.gz \
/data/mri/subject001/dti/ep2ddiff.bvec \
/data/mri/subject001/dti/ep2ddiff.bval

Then the temporary file would be created in your home directory.  Obviously you can change this however you like.  My recent tests of XNAT and NiDB, which both allow for some pipeline processing have used an approach like the one in this script.


#!/bin/bash
current=`pwd`

#if on a Mac with DTIprep and Slicer installed
#assuming both in /Applications directory
#modify if elsewhere or on other OS.
export PATH=$PATH:/Applications/Slicer.app/Contents/lib/Slicer-4.4/cli-modules
export PATH=$PATH:/Applications/DTIPrep.app/Contents/MacOS
#some quick error checking
if [ $# -lt 3 ]; then
 echo "Usage: ./dti_qc <nifti_file> <bvecs> <bvals>"
 echo "Usage: ./dti_qc myfile.nii.gz myfile.bvec myfile.bval"
 exit;
fi
if [ ! -e $1 ]; then
 echo "$1 does not exist. Use a real file."
 exit;
fi
if [ ! -e $2 ]; then
 echo "$2 does not exist. Use a real file."
 exit;
fi
if [ ! -e $3 ]; then
 echo "$3 does not exist. Use a real file."
 exit;
fi
if [ `which DWIConvert | wc -l` -eq 0 ]; then
 echo "Cannot find DWIConvert, is it in your PATH?"
 exit;
fi
if [ `which DTIPrepExec | wc -l` -eq 0 ]; then
 echo "Cannot find DTIPrepExec, is it in your PATH?"
 exit;
fi
echo "Files found, proceeding with Quality Check"
#create a temporary working space with date & time
foldername=`date +"%m%d%y_%T" | sed 's/://g'`
mkdir dti.${foldername}
#copy over DWI image data and transpose bvals
3dcopy $1 dti.${foldername}/dwi.nii
1dtranspose $3 > dti.${foldername}/bval.txt
#transpose b-vectors, flip y gradient b/c Siemens...
1dDW_Grad_o_Mat \
-in_grad_rows $2 \
-out_grad_cols dti.${foldername}/bvec.txt \
-flip_y \
-keep_b0s
#change into working directory
cd dti.${foldername}
#convert DWI image data from NIFTI to NRRD
DWIConvert \
--inputVolume dwi.nii \
--inputBVectors bvec.txt \
--inputBValues bval.txt \
--conversionMode FSLToNrrd \
-o dwi.nrrd
#Run default QC check
DTIPrepExec \
-c \
-d \
-p test.xml \
-w dwi.nrrd \
--numberOfThreads 4
#Convert corrected DWI image data from NRRD to NIFTI
DWIConvert \
--inputVolume dwi_QCed.nrrd \
--outputVolume dwi_QCed.nii \
--outputBVectors dwi_QCed.bvec \
--outputBValues dwi_QCed.bval \
--conversionMode NrrdToFSL
echo "Total Good Gradients: `cat dwi_QCed.bvec | wc -l`"
#copy report back to original data location
cp *QCReport.txt ../
cd $current

Possible modifications include more automation and error checking, as well as someone could awk/grep through the DTIprep configuration file (XML) and change options as they wished before continuing on.  I’ve mostly been using this as a quick assessment of how the diffusion data looks, since DTIprep will remove gradients with too much motion, noise, bad stuff, the final count reported is the actual directions + 1 b0.

DTIprep for Preprocessing of DWI Data

As I’ve mentioned before, it’s a good idea to do some preprocessing on your diffusion imaging data!  Previous tutorials have covered using AFNI’s built-in tools (Part 1, Part 2, Part 3) as well as the very formidable TORTOISE (Part 1, Part 2, Part 3).  As with most things in NeuroImaging, you have many options when processing your data!  So today I’m going to cover a bit about DTIprep.  If you’re wondering how DTIprep stacks up against TORTOISE, I encourage you to read this publication.

You will notice that DTIprep and TORTOISE work very differently and have different strengths and weaknesses!  Ultimately you will have to weigh these against your goals and decide which software suits your needs more.  In my initial tests, both packages improve tractography results.  I think the one major plus to TORTOISE for my needs (right now) is the integration of blip-up blip-down correction.  Though with some creative fiddling, you could (probably) use this tool with DTIprep output.

Before you go too much further, I encourage you to download 3D Slicer (sometimes just called “Slicer”), as DTIprep makes use of several other modules in the software, particularly data format conversion.  Like TORTOISE, DTIprep has a nice Graphical User Interface (GUI).  Unlike TORTOISE, DTIprep also has a command line interface for easy scripting!  That’s not to say that you cannot automate TORTOISE, indeed we have automated it using the IDL interface, but that requires a full license of IDL and a willingness to fiddle with your input files until you can match what TORTOISE expects!

Also unlike TORTOISE, which accepts a great number of input formats, DTIprep currently only accepts data in NRRD format, though it does have a converter for reading DICOM files in.  I’m not sure I count this as a deal breaker, as I’ve found that NRRD is a fairly nice file format and includes information about the B-MATRIX right alongside the imaging data!

DTIprep_main_window

DTIprep Main Window

Data Conversion to NRRD

Whether you plan to use the GUI or not, converting your imaging data to NRRD format (or back to NIFTI) is fairly straightforward using the DWIConvert module of Slicer.  You can use the two examples below to convert DICOM files or NIFTI files over to NRRD format.

If converting from NIFTI format, one REALLY important thing to remember is that DWIConvert expects your b-value and b-vector files to be in column format, instead of the row format output by dcm2nii!  So you will want to use a tool like 1dtranspose in AFNI to flip the files before you run the conversion.  Failure to do so will result in the NRRD file representing the gradient files incorrectly, which will probably cause bad things to happen when you later analyze your data!

Convert data to NRRD from DICOM

DWIConvert \
-i ep2d_DTI_32dirs_4B0_AP_22 \
-o dwi.nrrd \
--conversionMode DicomToNrrd

Convert data to NRRD from NIFTI

DWIConvert \
--inputVolume ep2dDTI.nii.gz \
-o dwi.nrrd \
--conversionMode FSLToNrrd \
--inputBVectors ep2dDTI.bvec \
--inputBValues ep2dDTI.bval

Using DTIprep

Now that data is converted to NRRD format, open DTIprep and click the icon in the upper left corner (labeled “Open NRRD”).  You will immediately see information about your diffusion data (pictured below).  When converting from DICOM I’ve noticed some differences between DWIConvert and both TORTOISE and dcm2nii/Mricron.  If this bothers you (and that’s perfectly valid) you can convert the NIFTI files from dcm2nii using the second approach above!  I’ve submitted a bug report to the folks making DWIConvert (March 23, 2015).

DTIPrep_DiffTable3

 Once you have verified that the data loaded as NRRD is correct (correct gradient directions and b-values), you can setup your QA protocol.  Click on the second tab titled “Protocol” and you will notice that everything is currently empty.  Click “Default” to load up a boilerplate protocol with your imaging parameters, which will generate the list below.

DTIprep_protocol

You can modify this protocol by expanding any of the dropdown lists or changing any of the “No” options to a “Yes”.  If you do this you may need to point the software to the appropriate module within Slicer.  On my Mac install of Slicer, the modules are located within the application package (Slicer.app/Contents/lib/Slicer-4.4/cli-modules), whereas on Linux they are conveniently located in the “Plug-in” folder.  Once you have setup everything, click the “RunByProtocol” button and proceed to wait for a bit.  On my Macbook Pro it only takes about 15 minutes to run the default protocol on 36 directions of 2mm^3 data (compared to almost an hour for TORTOISE).

If you just wish to use the default parameters and automate DTIprep from the command line, you can use the DTIPrepExec program within the Mac Application Bundle (or just call DTIprep if you’re running linux). The odd part here is that you have to give it the name of an xmlProtocol even though it’s going to create it using the defaults.  You can also tell it how many processors to use.  Should you wish to modify the XML file, leave out the –check option and then grep, sed, and awk to change the defaults to how you see fit.

DTIPrep.app/Contents/MacOS/DTIPrepExec \
--default \
--check \
--xmlProtocol SomeProto.xml \
--numberOfThreads 8 \
--DWINrrdFile dwi.nrrd

DTIprep Results

DTIprep will spit out a number of output files, these are usually named using some portion of your input NRRD file.  So if my input was dwi.nrrd, then the output files are:

  1. dwi_QCed.nrrd – the data file after preprocessing (with bad directions removed)
  2. dwi_QCReport.txt – a text file detailing the QC procedure and results, look to the end for a summary
  3. dwi_XMLQCResults.xml – an XML file detailing the QC results

If you want to use DTIprep as a quick Quality Control check of your DTI data, you can just spit out the last few lines of the QCReport:

tail -3 dwi_QCReport.txt

Or if you want to use grep:

cat dwi_QCReport.txt | grep PASS
cat dwi_QCReport.txt | grep FAIL

Where to go from here?

Now that you’ve run your data through DTIprep, you can convert it back to NIFTI format for use with various tractography programs, including those in AFNI (Part 3).

Convert data back to NIFTI from NRRD

DWIConvert \
--inputVolume dwi_QCed.nrrd \
--outputVolume dwi_QCed.nii.gz \
--outputBVectors dwi_QCed.bvec \
--outputBValues dwi_QCed.bval \
--conversionMode NrrdToFSL

Alternatively, you can make use of various other DTI fitting softwares out there!  DTIprep even includes it’s own, and I’ll try to cover those in a future post.

Analyzing DTI Data in AFNI (Part 3)

So far in the DTI series we’ve covered how to process data entirely in AFNI (Part 1, Part 2).  We’ve also covered how to preprocess and fit tensors in the nicely packaged form of TORTOISE (Part 1, Part 2, Part 3).  Regardless of how you got to the point of having tensors fit, you can continue to process data in AFNI!  And one of the ways that you can use AFNI to analyze your data is to generate tractography results using the tool 3dTrackID.  But before you go running deterministic or probabilistic tractography, I want to take a moment and say that it’s still important to double check your data!  Yes, I know that I told you that TORTOISE does all kinds of wonderful things, and many people reading this blog may think that AFNI can do no wrong.  But even if those two things were true, your data can still be lying to the software!

Which brings me to the topic of today’s post.  Flipping.  No, I’m not talking about gymnastics or hand gestures.  Instead I’m talking about how your B-MATRIX (sometimes bvec file) is setup in relation to your data.  It’s entirely possible that despite what you may believe, the DICOM or NIFTI files you are using might be lying to you.  By lying, I mean that the B-MATRIX/bvecs/whatever doesn’t match what’s really going on with your data.  So before you start running tractography assuming your data is correct, take a few minutes and double check your data using these steps.

First of all, take whatever data you have and run a whole-brain deterministic tractography search on it using 3dTrackID (here my naming conventions match TORTOISE):

3dTrackID -mode DET \
-logic OR \
-mask MASK.nii \
-netrois MASK.nii \
-dti_in INPREF_ \
-prefix o.dti.det.test

This will generate a whole-brain DTI image (shown below) that you can view in SUMA using:

suma -tract o.dti.det.test_001.niml.tract
SUMA_DTI_inwindow

SUMA Display of Whole-Brain Tractography

As you can see, we have a pretty healthy looking DTI image.  But if your data didn’t match the B-MATRIX that you were dealing with you might see some of these common changes (more available on SUMA’s new fancy documentation).

Flipping_Slide

Admittedly the hardest one to differentiate from the correct results is the “Flipped Y”.  But truthfully you may end up playing with all of these flips (or even combinations of flips) until you find one that works for your data.  So what does that mean?  Well it means you’re going to get to dust off a couple programs that you might not use on a regular basis: 1dDW_Grad_o_Mat and 3dDWItoDT.

To make things even more concrete, let’s take an example where the data is flipped in the X direction.  If I’m using the output of TORTOISE, the process I would use is as follows.  My files are listed as DWI.nii, BM.txt, and possibly a MASK.nii.  These are the diffusion weighted data, a whole-brain mask (if you don’t have one, use 3dAutomask) and the B-MATRIX (if you used the AFNI export in TORTOISE it’s in the AFNI format referred to in 1dDW_Grad_o_Mat).

#Flip the gradient directions in your BM.txt
1dDW_Grad_o_Mat \
-in_bmatA_cols BM.txt \
-out_bmatA_cols BM_flipX.txt \
-flip_X \
-keep_b0s
#Refit your tensors with the new gradients
3dDWItoDT -prefix DT_flipx \
-reweight -nonlinear -eigs \
-sep_dsets \
-mask MASK.nii \
-bmatrix_Z BM_flipX.txt DWI.nii

#Use whole-brain deterministic tractography to check
3dTrackID -mode DET \
-logic OR \
-mask MASK.nii \
-netrois MASK.nii \
-dti_in DT_flipx_ \
-prefix o.afni.flipx

#visualize in SUMA
suma -tract o.afni.flipx_001.niml.tract

And if that didn’t work, try flipping another direction.  Here is another place where scripting is your friend.  Or enemy if you made a typo, but we’ll hope that it saves you time!  See you next time!